After all the configuration and updates that must do to proceed with the Deployment of Windows 10 2004 i start to test if i can add more automation in MDT than has.
If you use MDT maybe has find out that you can almost full automate your Deployment of Windows 10 and eliminate all the clicks that needs before start to Deploy the Windows.
So i start the tests in my lab and finally do my first deployment without any click.
Today i would like to write down all the details and configurations that must change until full automate your deployment
Prerequisites
Before start to do changes you must already has a Windows Deployment Server in your environment to deploy your image through the network.
Find out my articles which explain step by step hw can install and configure the WDS with MDT
How Deploy Windows image using MDT and WDS in Windows Server 2016 (Part 1)
How Deploy Windows image using MDT and WDS in Windows Server 2016 (Part 2)
If you don't have WDS and you don't plan to install then you can configure the MDT to automate the deployment and create a Media to use it as bootable USB.
You can find instructions how can do it from my article
Create a bootable USB with MDT 2013
How to configure MDT
Customsettings.ini and Bootstart.ini is the main files of your configuration to improve the automation of your MDT.
- Open the MDT
- Right click in the MDT Deployment Share
- Click in Tab Rules
- Some of these commands already have it.
- But here you will change the value of the command is the SkipBDDWelcome=YES.
- This means that you must configure in Customsettings.ini all the properties which went through until now when start the Deployment Wizard.
- Some of these commands you can just use it alone without need to provide other Property which is mandatory.
- But for the following commands must provide another property which are deppended

- For SkipBDDWelcome read the Providing Properties for Skipped Deployment Wizard Pages from Microsoft for the properties that must provide.
- Also the SkipBDDWelcome must include in the Bootstrap.ini
- For SkipTaskSequence must provide and the TaskSequenceID.
- The TaskSequenceID you can find it from the Task Sequence

- For SkipTimeZone must provide the TimeZoneName
- For SkipDomainMembership must provide the JoinWorkgroup or JoinDomain & DomainAdmin
- For all the other properties you don't need to provide additional mandatory property except if you want.
- So Add the following lines in your Customsettings.ini and change TaskSequenceID ,TimeZoneName ,OSDComputerName with your prefer values
[Settings]
Priority=Default
[Default]
_SMSTSORGNAME=Askme4tech
UserDataLocation=NONE
OSInstall=Y
HideShell=YES
SkipBDDWelcome=YES
SkipTaskSequence=YES
TaskSequenceID=W2004_NEW
SkipTimeZone=YES
TimeZoneName=Pacific Standard Time
SkipDomainMembership=YES
JoinWorkgroup=WORKGROUP
SkipComputerName=YES
OSDComputerName=%ComputerSerialNumber%
DoNotCreateExtraPartition=YES
ApplyGPOPack=NO
SkipAdminPassword=YES
SkipProductKey=YES
SkipUserData=YES
SkipLocaleSelection=YES
SkipApplications=YES
SkipBitLocker=YES
SkipSummary=YES
SkipRoles=YES
SkipCapture=YES
SkipFinalSummary=YES
EventService=http://MDT:9800
SLShare=\\192.168.50.24\deploymentlogs$
SLShareDynamicLogging=\\192.168.50.24\deploymentlogs$
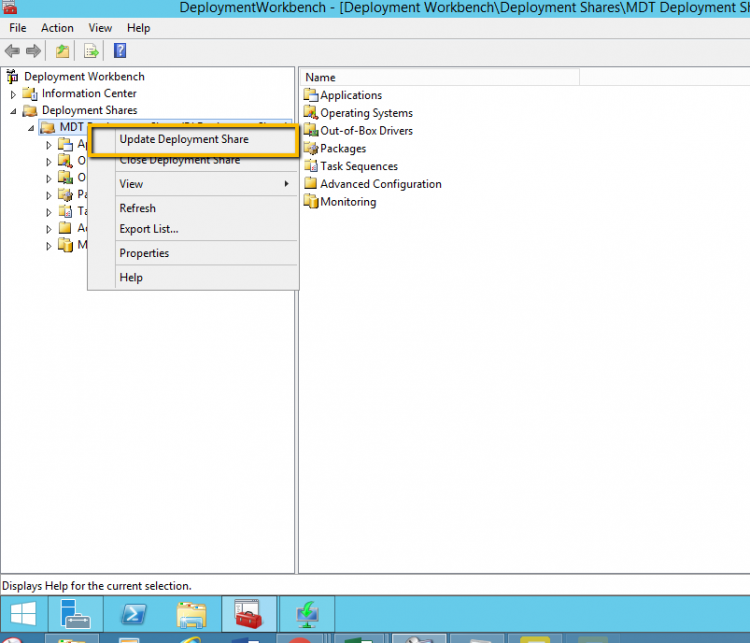
- After save the Bootstrap.ini and Customsettings.ini go in MDT Deployment Share with right click and select the Update Deployment Share.
- Wait until finish

- Open the WDS (Windows Deployment Service) and replace the Boot Image with the updated
- Now you are ready to proceed with the Deployment that will be almost full automated.
MDT has lot of ways to configure it and improve automation. Just you must find the way.
Have a nice weekend
Sponsor
>

Free Tools for everyone


